# T2 P1 - Effacer nos traces

Cette partie du guide pratique sert à vous montrer comment effacer vos traces d’activité militante, en rendant impossible leur récupération

## Nous ne supprimons pas réellement nos fichiers

<span style="text-decoration: none;">Sachez que m</span><span style="text-decoration: none;">ême lorsque vous pensez avoir </span><span style="text-decoration: none;">réellement</span><span style="text-decoration: none;"> effac</span><span style="text-decoration: none;">é</span><span style="text-decoration: none;"> des données, ces dernières laissent toujours </span><span style="text-decoration: none;">des traces.</span>

<span style="text-decoration: none;">Dans le cas d’un </span><span style="text-decoration: none;">ou </span><span style="text-decoration: none;">plusieurs fichiers/dossiers supprimés </span><span style="text-decoration: none;">sur </span><span style="text-decoration: none;">votre PC, même en fois la corbeille vidée, ces derniers reste</span><span style="text-decoration: none;">nt</span><span style="text-decoration: none;"> physiquement présent</span><span style="text-decoration: none;">s</span><span style="text-decoration: none;"> sur votre disque dur. En effet, lorsque nous supprimons un fichier, ce dernier n’est pas réellement « supprimé », mais marqué comme « à supprimer », il reste cependant physiquement sur le disque dur, jusqu’à ce que d’autres données ne l’écrase</span><span style="text-decoration: none;">nt</span><span style="text-decoration: none;">.   
</span><span style="text-decoration: none;">Il existe, sur les différents systèmes d’exploitation (Windows, Linux, Mac OS) des logiciels ou des commandes, pour vous permett</span><span style="text-decoration: none;">re</span><span style="text-decoration: none;"> de réellement supprimer le fichiers/dossiers qui vous </span><span style="text-decoration: none;">intéressent</span><span style="text-decoration: none;">, en écrasant leurs données sur le disque dur, </span><span style="text-decoration: none;">pour qu’on ne puisse pas les récupérer</span>

## Comment « réellement » supprimer vos données ?

<span style="text-decoration: none;">J</span><span style="text-decoration: none;">e vais vous présenter ici </span><span style="text-decoration: none;">quelques</span><span style="text-decoration: none;"> logiciels/</span><span style="text-decoration: none;">commandes</span><span style="text-decoration: none;"> </span><span style="text-decoration: none;">qui</span><span style="text-decoration: none;"> </span><span style="text-decoration: none;">peuvent</span><span style="text-decoration: none;"> </span><span style="text-decoration: none;">vous permettre </span><span style="text-decoration: none;">de réellement supprimer vos don</span><span style="text-decoration: none;">nées.</span>

<span style="text-decoration: none;">(Attention, soyez extrêmement vigilant.e sur les fichiers que vous supprime</span><span style="text-decoration: none;">z, </span><span style="text-decoration: none;">il ne pourron</span><span style="text-decoration: none;">t</span><span style="text-decoration: none;"> pas être récupérés !</span><span style="text-decoration: none;">)</span>

<span style="text-decoration: none;">Vous n’êtes bien entendue pas obligé.</span><span style="text-decoration: none;">e</span><span style="text-decoration: none;"> de l</span><span style="text-decoration: none;">e</span><span style="text-decoration: none;"> faire pour le moindre fichier personnel, mais je le recommande fortement s</span><span style="text-decoration: none;">i ce</span><span style="text-decoration: none;"> sont </span><span style="text-decoration: none;">des fichiers</span><span style="text-decoration: none;"> sensible</span><span style="text-decoration: none;">s</span><span style="text-decoration: none;">, </span><span style="text-decoration: none;">et que</span><span style="text-decoration: none;"> vous ne voulez pas </span><span style="text-decoration: none;">qu’on puisse les récupérer</span>

<span style="text-decoration: none;">J</span><span style="text-decoration: none;">e vous montrerais </span><span style="text-decoration: none;">également</span><span style="text-decoration: none;"> comment effacer toutes traces de fichiers supprim</span><span style="text-decoration: none;">é</span><span style="text-decoration: none;">s</span><span style="text-decoration: none;"> </span><span style="text-decoration: none;">par le passé</span><span style="text-decoration: none;"> sur votre ordinateur. </span><span style="text-decoration: none;">Cela peut être utile si vous voulez vous assurer qu’il ne reste plus aucune traces de fichiers sensibles </span><span style="text-decoration: none;">sur l’espace libre de votre disque dur</span>

### Sur Windows :

Nous pouvons trouver sur Windows les 2 logiciels/commandes suivantes pour écraser des fichiers :

- Le logiciel **Eraser**
    
    
    - [Télécharger ici](https://eraser.heidi.ie/download/)
    - [Tutoriel ici](https://lecrabeinfo.net/eraser-supprimer-un-fichier-definitivement-sur-windows.html)

Si vous souhaitez télécharger **Eraser**<span style="font-weight: normal;">, attention à ne pas vous faire avoir par les faux lien</span><span style="font-weight: normal;">s</span><span style="font-weight: normal;"> de téléchargement pouvant apparaître sur la page, il s’agit potentiellement de lien</span><span style="font-weight: normal;">s</span><span style="font-weight: normal;"> frauduleux ou </span><span style="font-weight: normal;">pointant</span><span style="font-weight: normal;"> vers des publicités.</span>

Vous devez cliquer sur une des versions listées en dessous du paragraphe, de préférence la première (qui est la plus récente)

[![tutos_effacer_traces-download_eraser.png](https://wiki.extinctionrebellion.fr/uploads/images/gallery/2023-12/scaled-1680-/qXcQdMSWvYTSeZyq-tutos-effacer-traces-download-eraser.png)](https://wiki.extinctionrebellion.fr/uploads/images/gallery/2023-12/qXcQdMSWvYTSeZyq-tutos-effacer-traces-download-eraser.png)

**Attention :** Dans son utilisation, Eraser se base sur une liste de « tasks », correspondants aux fichiers/dossiers que l’on souhaite écraser, et pouvant être lancés manuellement ou automatiquement. Cette liste de « tasks » n’est pas supprimée automatiquement après avoir été lancée, je vous recommande donc de faire clique droit &gt; Delete task après l’avoir lancé si vous ne voulez pas qu’on puisse savoir que vous avez écrasé tel fichier ou dossier

- La commande **sdelete**<span style="font-weight: normal;"> </span><span style="font-weight: normal;">([Cliquer ici](https://wiki.extinctionrebellion.fr/books/securite-militante/page/ouvrir-et-utiliser-linvite-de-commandes#bkmrk-windows) pour </span><span style="font-weight: normal;">s</span><span style="font-weight: normal;">avoir </span><span style="font-weight: normal;">comment </span><span style="font-weight: normal;">ouvrir l’invite de commande</span><span style="font-weight: normal;">)</span>
    
    
    - [Télécharger ici](https://learn.microsoft.com/en-us/sysinternals/downloads/sdelete)
    - [Tutoriel ici](https://www.it-connect.fr/sdelete-supprimer-des-donnees-definitivement-sous-windows/)

#### <a name="Purger%20espace%20libre%20-%20%20Windows"></a>Purger l’espace libre du disque dur

<span style="font-weight: normal;">([Cliquer ici](https://wiki.extinctionrebellion.fr/books/securite-militante/page/ouvrir-et-utiliser-linvite-de-commandes#bkmrk-windows) pour </span><span style="font-weight: normal;">s</span><span style="font-weight: normal;">avoir </span><span style="font-weight: normal;">comment </span><span style="font-weight: normal;">ouvrir l’invite de commande</span><span style="font-weight: normal;">)</span>

Vous pouvez également vous assurez qu’il ne reste plus aucune trace d’anciennes données supprimées sur votre disque dur, en exécutant des commandes ou des logiciels qui vont automatiquement purger/écraser l’espace libre.

La **défragmentation**<span style="font-weight: normal;"> du disque dur permet de purger </span><span style="font-weight: normal;">l</span><span style="font-weight: normal;">es données marquées comme supprimées.</span><span style="font-weight: normal;">  
[Cliquez ici](https://support.microsoft.com/fr-fr/windows/d%C3%A9fragmenter-votre-ordinateur-windows-10-048aefac-7f1f-4632-d48a-9700c4ec702a) pour savoir comment défragmenter un disque dur sur Windows 10</span>

La commande **sdelete**<span style="font-weight: normal;"> permet </span><span style="font-weight: normal;">aussi</span><span style="font-weight: normal;"> d’écraser l’espace libre de votre disque dur</span><span style="font-weight: normal;">, </span><span style="font-weight: normal;">avec la commande suivante :  
</span><span style="color: rgb(255, 255, 255);">**<span style="background: #492300;">sdelete.exe -c C:</span>**</span>  
<span style="font-weight: normal;">  
Vous pouvez faire la même chose sans </span><span style="font-weight: normal;">avoir à installer </span>**sdelete**<span style="font-weight: normal;"> avec la commande suivante :   
</span><span style="color: rgb(255, 255, 255);">**<span style="background: #492300;">cipher /wC: </span>**</span>

**« cipher »** <span style="font-weight: normal;">étant</span><span style="font-weight: normal;"> déjà installé de base sur Windows</span>

<span style="font-weight: normal;">Je vous conseille fortement de fermer un maximum de logiciel sur votre ordinateur </span><span style="font-weight: normal;">avant</span><span style="font-weight: normal;"> l’</span><span style="font-weight: normal;">exécution</span><span style="font-weight: normal;"> de cette commande</span>

<span style="font-weight: normal;">Une fois la commande lancée, s</span><span style="font-weight: normal;">oyez patient.e, </span><span style="font-weight: normal;">cela</span><span style="font-weight: normal;"> va prendre un certain temps</span>

### Sur Mac OS :

<span style="background-color: rgb(255, 255, 255);">**<ins class="diffins"><span style="background-color: rgb(255, 255, 255);">Note1 :</span></ins>**<ins class="diffins"><span style="background-color: rgb(255, 255, 255);"> De OS 10.4 à 10.10 il existe une fonction de "</span></ins>**<ins class="diffins"><span style="background-color: rgb(255, 255, 255);">vider la corbeille en mode sécurisé</span></ins>**<ins class="diffins"><span style="background-color: rgb(255, 255, 255);"> ". Cette fonction ayant pour but d'effacer les documents</span> <span style="background-color: rgb(255, 255, 255);">de manière fiables (information que l'on retrouve sur de nombreux sites) est en réalité limitée. Elle a d'ailleurs été supprimée depuis OS 10.11 car elle n'est pas réellement efficace en fonction du matériel (disque) utilisé. Donc si vous ne maîtrisez pas quel</span> <span style="background-color: rgb(255, 255, 255);">type de matériel votre Mac est équipé, ou ne maîtrisez pas les limitations de cette fonction, </span></ins>**<ins class="diffins"><span style="background-color: rgb(255, 255, 255);">ne la considérez pas comme fiable.</span></ins>**</span>

<span style="background-color: rgb(255, 255, 255);"><ins class="diffins"> </ins></span>

<span style="background-color: rgb(255, 255, 255);"><ins class="diffins"><span style="background-color: rgb(255, 255, 255);">La</span> <span style="background-color: rgb(255, 255, 255);">commande </span></ins>**<ins class="diffins"><span style="background-color: rgb(255, 255, 255);">rm -P</span></ins>**<ins class="diffins"><span style="background-color: rgb(255, 255, 255);"> permet d'écraser un fichier en écrivant plusieurs fois. La encore, en fonction du matériel utilisé elle peut avoir des limitations sur son efficacité. Cependant elle reste la fonction native la plus simple installée par défaut.</span></ins></span>

<span style="background-color: rgb(255, 255, 255);"><ins class="diffins"> </ins></span>

<span style="background-color: rgb(255, 255, 255);">**<ins class="diffins"><span style="background-color: rgb(255, 255, 255);">Point d'attention :</span></ins>**<ins class="diffins"><span style="background-color: rgb(255, 255, 255);"> Apple aime bien sécuriser vos données. Ceci implique donc de nombreuses copies réalisées un peu partout. Par exemple dans iCloud ou TimeMachine. Effacer vos données de votre ordi n'implique donc pas que la donnée en question ne reste pas accessible sur d'autres supports.</span></ins></span>

<span style="background-color: rgb(255, 255, 255);"><ins class="diffins"> </ins></span>

<span style="background-color: rgb(0, 0, 0);"><span style="background-color: rgb(255, 255, 255);"><ins class="diffins"><span style="background-color: rgb(255, 255, 255);">Pour de plus amples informations sur</span> <span style="background-color: rgb(255, 255, 255);">MAC :</span> </ins></span>[<ins class="diffins"><span style="background-color: rgb(255, 255, 255);">https://ssd.eff.org/fr/module/guide-pratique-supprimer-vos-donn%C3%A9es-en-toute-s%C3%A9curit%C3%A9-sous-macos</span></ins>](https://ssd.eff.org/fr/module/guide-pratique-supprimer-vos-donn%C3%A9es-en-toute-s%C3%A9curit%C3%A9-sous-macos)</span>

### Sur Linux :

<span style="font-weight: normal;">([Cliquer ici](https://wiki.extinctionrebellion.fr/books/securite-militante/page/ouvrir-et-utiliser-linvite-de-commandes#bkmrk-linux-%E2%80%93-tails) pour </span><span style="font-weight: normal;">s</span><span style="font-weight: normal;">avoir </span><span style="font-weight: normal;">comment </span><span style="font-weight: normal;">ouvrir l’invite de commande</span><span style="font-weight: normal;">)</span>

Il existe sur Linux la commande **shred** pour écraser des fichiers, déjà installée de base, dont voici une [documentation ](https://doc.ubuntu-fr.org/shred)[plus complète](https://doc.ubuntu-fr.org/shred)[ ici](https://doc.ubuntu-fr.org/shred)

Pour simplement supprimer (définitivement) un fichier, vous pouvez faire :  
<span style="color: rgb(255, 255, 255);"><span style="background: #000000;">sudo shred -u</span><span style="background: #000000;">vz</span><span style="background: #000000;"> &lt;fichier&gt; </span></span>

<span style="background: #ffffff;">Pour écraser tout un dossier, vous pouvez taper l</span><span style="background: #ffffff;">es</span><span style="background: #ffffff;"> commande</span><span style="background: #ffffff;">s</span><span style="background: #ffffff;"> suivante</span><span style="background: #ffffff;">s </span><span style="background: #ffffff;">:  
</span><span style="background: #000000;"><span style="color: rgb(255, 255, 255);">IFS=$'\\n'</span> </span><span style="background: transparent;"> (</span><span style="background: transparent;">Nécessaire</span><span style="background: transparent;"> s</span><span style="background: transparent;">i certains noms de fichiers contiennent des espaces)</span><span style="background: #ffffff;">  
</span><span style="color: rgb(255, 255, 255);"><span style="background: #000000;">sudo </span><span style="background: #000000;">shred -uvz $(find &lt;</span><span style="background: #000000;">dossier</span></span><span style="background: #000000;"><span style="color: rgb(255, 255, 255);">&gt; -type f) </span>  
</span><span style="background: rgb(0, 0, 0); color: rgb(255, 255, 255);">rm -rf &lt;dossier&gt; </span>

#### <a name="Purger%20espace%20libre%20-%20Linux"></a>Purger l’espace libre du disque dur

<span style="font-weight: normal;">([Cliquer ici](https://wiki.extinctionrebellion.fr/books/securite-militante/page/ouvrir-et-utiliser-linvite-de-commandes#bkmrk-linux-%E2%80%93-ubuntu) pour </span><span style="font-weight: normal;">s</span><span style="font-weight: normal;">avoir </span><span style="font-weight: normal;">comment </span><span style="font-weight: normal;">ouvrir l’invite de commande</span><span style="font-weight: normal;">)</span>

La **défragmentation**<span style="font-weight: normal;"> du disque dur permet de purger </span><span style="font-weight: normal;">l</span><span style="font-weight: normal;">es données marquées comme supprimées.</span><span style="font-weight: normal;">  
[Cliquez ici](https://ubunlog.com/fr/comment-d%C3%A9fragmenter-sous-linux/) pour savoir comment défragmenter un disque dur sur </span><span style="font-weight: normal;">Linux</span>

Il existe aussi sur Linux la commande **sfill** permettant de purger tout l’espace libre du disque dur, vous devez ce<span style="color: #000000;">pendant </span><span style="color: #000000;">inst</span>aller le paquet **secure-delete** pour avoir accès à cette commande.

<span style="font-weight: normal;">Si vous êtes sur une distribution Debian de linux (Ubuntu, Tails, Linux mint, Pure OS) :  
<span style="background-color: rgb(0, 0, 0); color: rgb(236, 240, 241);">sudo apt-get install secure-delete</span>  
</span>

<span style="font-weight: normal;">Si vous êtes sur une distribution basée sur Red Hat (Fedora, CentOS) :  
<span style="color: rgb(236, 240, 241); background-color: rgb(0, 0, 0);">sudo yum install secure-delete</span>  
</span>

<span style="font-weight: normal;">Une fois la commande **sfill** installée, voici des exemples de syntaxes de la commande **sfill** :</span>

<span style="font-weight: normal;">Purger tout l'espace libre du disque dur :  
<span style="background-color: rgb(0, 0, 0); color: rgb(255, 255, 255);">sudo sfill -v / </span>  
</span>

<span style="font-weight: normal;">Purger l’espace libre un peu plus rapidement, en réécrivant moins de fois les données  
<span style="color: rgb(255, 255, 255); background-color: rgb(0, 0, 0);">sudo sfill -vl / </span></span>

Purger l’espace libre encore plus rapidement, en réécrivant encore moins de fois les données  
<span style="color: rgb(255, 255, 255); background-color: rgb(0, 0, 0);">sudo sfill -vll / </span>

Purger l’espace libre encore plus rapidement, encore moins sécurisé :  
<span style="background-color: rgb(0, 0, 0); color: rgb(255, 255, 255);">sudo sfill -vfll / </span>

Ces commandes prennent un temps conséquent pour purger/écraser tout l’espace libre du disque dur, je vous conseille de trouver une occupation en attendant.

## Comment « réellement » désinstaller nos logiciels

En plus des fichiers eux mêmes, vous pouvez également vouloir désinstaller des logiciels sensibles, dont vous ne souhaitez pas laisser de traces sur votre ordinateur, et vous n’allez bien entendu pas utiliser un logiciel comme **Eraser**, ou **shred** <span style="font-weight: normal;">sur chaque fichier relatif au logiciel pour cela, ce serait beaucoup trop long.</span>

<span style="font-weight: normal;">Je vais vous proposer à la place quelques logiciels ou commandes qui vont </span><span style="font-weight: normal;">supprimer automatiquement toutes les traces qu’ils trouveront de </span><span style="font-weight: normal;">ce que vous souhaitez désinstaller</span>

<span style="font-weight: normal;">A</span><span style="font-weight: normal;">près ces « purge » </span><span style="font-weight: normal;">faites</span><span style="font-weight: normal;">, </span><span style="font-weight: normal;">vous aurez la possibilité</span><span style="font-weight: normal;"> </span><span style="font-weight: normal;">d’</span><span style="font-weight: normal;">écraser l’espace libre </span><span style="font-weight: normal;">de votre disque</span><span style="font-weight: normal;">, </span><span style="font-weight: normal;">pour vous assurez qu’</span><span style="font-weight: normal;">on </span><span style="font-weight: normal;">ne</span><span style="font-weight: normal;"> puisse pas</span><span style="font-weight: normal;">, même en récupérant les fichiers supprimés, savoir que vous </span><span style="font-weight: normal;">avez utilisé tel logicie</span><span style="font-weight: normal;">l</span><span style="font-weight: normal;">.</span>

<span style="font-weight: normal;">Bien entendu, l</span><span style="font-weight: normal;">e risque 0 </span><span style="font-weight: normal;">de retrouver des traces des logiciels supprimé</span><span style="font-weight: normal;">s</span><span style="font-weight: normal;"> sur l’ordinateur n’existe pas, mais utiliser ces techniques le diminue drastiquemen</span><span style="font-weight: normal;">t</span>

### **Sur Windows :**

Il existe sur Windows le logiciel **Revo Uninstaller**, ce dernier va supprimer toutes les traces qu’il peut trouver d’un logiciel donné.

Vous pouvez [le télécharger ici](https://www.revouninstaller.com/fr/revo-uninstaller-free-download/)  
Le site propose des versions payantes de ce logiciel, mais la version gratuite est suffisante.

Voici un petit [tutoriel ici](https://lecrabeinfo.net/desinstaller-proprement-un-logiciel-windows-avec-revo-uninstaller.html#desinstaller-proprement-un-logiciel-avec-revo-uninstaller)

**Point de restauration système :**<span style="font-weight: normal;"> Il est parlé </span><span style="font-weight: normal;">dans le tuto ci-dessus</span><span style="font-weight: normal;"> de créer un point de restauration système. Cela offre une sécurité au cas où la dé</span><span style="font-weight: normal;">s</span><span style="font-weight: normal;">installation du logiciel nuit au fonctionnement de Windows.  
Cependant, si vous voulez vraiment effacer les traces de votre logiciel, je vous conseille soit de décocher la </span><span style="font-weight: normal;">case, soit de bien veiller à supprimer le point de restauration système </span><span style="font-weight: normal;">une fois</span><span style="font-weight: normal;"> le logiciel désinstallé.</span>

#### Après Revo Uninstaller :

  
Après votre ou vos logiciels supprimés par  **Revo Uninstaller**, pensez à vider la corbeille.  
En effet, **Revo Uninstaller** risque de mettre dans la corbeille certains fichiers liés au logiciel, ainsi, en plus de laisser des traces, ces derniers ne seront pas écrasés si vous utilisez une commande pour écraser l’espace libre de votre disque dur.

<span style="font-weight: normal;">Une fois </span>**Revo Uninstaller**<span style="font-weight: normal;"> </span><span style="font-weight: normal;">utilisé, et votre corbeille vidée, </span><span style="font-weight: normal;">vous pouvez, </span><span style="font-weight: normal;">en plus, écraser l’espace libre de votre disque dur, pour être sûr</span><span style="font-weight: normal;">e</span><span style="font-weight: normal;"> que même le fichiers </span><span style="font-weight: normal;">supprimés </span><span style="font-weight: normal;">associés au logiciel désinstallé ne pourront pas être récupéré</span><span style="font-weight: normal;">s</span>

<span style="font-weight: normal;">Pour </span><span style="font-weight: normal;">se </span><span style="font-weight: normal;">faire</span><span style="font-weight: normal;">, </span><span style="font-weight: normal;">vous </span><span style="font-weight: normal;">pouvez vous rendre à cette [section](#bkmrk-purger-l%E2%80%99espace-libr), qui vous montre comment faire.</span>

<span style="font-weight: normal;">Cette </span><span style="font-weight: normal;">action</span><span style="font-weight: normal;"> peut prendre un certain temps pour </span><span style="font-weight: normal;">s’exécuter</span>

### Sur Linux :

<span style="font-weight: normal;">([Cliquez ici](https://wiki.extinctionrebellion.fr/books/securite-militante/page/ouvrir-et-utiliser-linvite-de-commandes#bkmrk-linux-%E2%80%93-ubuntu) pour </span><span style="font-weight: normal;">s</span><span style="font-weight: normal;">avoir </span><span style="font-weight: normal;">comment </span><span style="font-weight: normal;">ouvrir l’invite de commande</span><span style="font-weight: normal;">)</span>

Vous pouvez d’abord lister tout les paquets installés avec la commande :  
<span style="background: rgb(0, 0, 0); color: rgb(255, 255, 255);">sudo apt list –installed   
</span>

<span style="background: transparent;">Ou bien lister les paquets qui vous intéresse</span><span style="background: transparent;">nt</span><span style="background: transparent;">, en filtrant par nom, avec cette commande :  
</span><span style="color: rgb(255, 255, 255);"><span style="background: #000000;">sudo apt list –installed </span><span style="background: #000000;">| grep </span><span style="background: #000000;">&lt;filtre&gt; </span></span><span style="background: #000000;">  
</span><span style="background: transparent;">Remplace</span><span style="background: transparent;">z</span><span style="background: transparent;"> </span><span style="background: transparent;">&lt;filtre&gt;</span><span style="background: transparent;"> </span><span style="background: transparent;">par ce que vous voulez.</span>

Vous pouvez ensuite purger le logiciel souhaité, avec la commande :  
<span style="color: #ffffff;"><span style="background: #000000;">sudo apt-get purge </span></span><span style="color: #ffffff;"><span style="background: #000000;">&lt;logiciel&gt;</span></span><span style="color: #ffffff;"><span style="background: #000000;"> </span></span><span style="color: #ffffff;"><span style="background: #000000;">  
</span></span><span style="color: #000000;"><span style="background: transparent;">Remplacer </span></span><span style="color: #000000;"><span style="background: transparent;">&lt;logiciel&gt;</span></span><span style="color: #000000;"><span style="background: transparent;"> pour le nom de logiciel à purger</span></span>

#### <span style="color: #000000;"><span style="background: transparent;">A</span></span><span style="color: #000000;"><span style="background: transparent;">près la purge</span></span>

<span style="color: #000000;"><span style="background: transparent;">U</span></span><span style="color: #000000;"><span style="background: transparent;">ne fois votre ou vos logiciels purgés, </span></span><span style="color: #000000;"><span style="background: transparent;">vous pouvez, si vous le souhaitez, </span></span><span style="color: #000000;"><span style="background: transparent;">purger/écraser l’espace libre du disque dur, pour vous assurer qu’on ne pourra pas trouver de trace des logiciel</span></span><span style="color: #000000;"><span style="background: transparent;">s</span></span><span style="color: #000000;"><span style="background: transparent;"> désinstallés, à partir </span></span><span style="color: #000000;"><span style="background: transparent;">des fichiers supprimés.</span></span>

<span style="color: #000000;"><span style="background: transparent;">P</span></span><span style="color: #000000;"><span style="background: transparent;">our cela, rendez vous dans cette </span></span>[section](#bkmrk-purger-l%E2%80%99espace-libr-0)

<span style="color: #000000;"><span style="background: transparent;">L’écrasement/purge de l’espace libre du disque dur peut prendre un temps assez conséquent</span></span>

## Effacer les méta-données

Parmi les différents types de traces que vous pourriez avoir besoin d’effacer sur votre ordinateur, il y a aussi les méta-données.

Les méta-données sont toutes les données qui tournent autour de la donnée « principale » d’un fichier.  
Pour donner un exemple plus clair, une photo peut avoir comme méta-donnés, l’appareil qui a servit à prendre la photo, la localisation correspondante au lieu d’où a été prise la photo, etc …

Ainsi, dans un fichier, en plus des données « principales » (par exemple, l’image en elle même dans le cas d’une photo), peuvent également êtres stockées d’autres données relatives à cette donnée « principale ».

Ces méta-données peuvent contenir des informations auxquelles vous n’avez pas envie que d’autres personnes n’aient accès.

Si vous avez par exemple pris des photos d’une action, il peut être pertinent d’y effacer les méta-données, avant de les publier sur internet

Je vais donc vous montrer comment effacer ces méta-données.

Vous pouvez également consulter [ce guide](https://wiki.extinctionrebellion.fr/books/securite-militante/page/effacer-les-metadonnees-dune-image), pour effacer les métadonnées d’une image, avec Gimp 4

### Signal

**Signal**, l’application de communication chiffrée que nous utilisons souvent au sein d’XR a la faculté de supprimer automatiquement les méta-données des photos/vidéos qu’on envoie.

Si vous envoyez par **Signal**<span style="font-weight: normal;">, à quelqu’un, des photos ou vidéos que vous avez prises, </span><span style="font-weight: normal;">leurs méta-données seront automatiquement supprimées</span>

### Exifcleaner

<span style="color: #000000;"><span style="background: transparent;">ExifCleaner est un outil </span></span><span style="color: #000000;"><span style="background: transparent;">simple d’utilisation</span></span><span style="color: #000000;"><span style="background: transparent;">, </span></span><span style="color: #000000;"><span style="background: transparent;">disponible à la fois sur Windows, Linux </span></span><span style="color: #000000;"><span style="background: transparent;">et</span></span><span style="color: #000000;"><span style="background: transparent;"> MacOS</span></span><span style="color: #000000;"><span style="background: transparent;">, qui va automatiquement retirer les méta-données de tout les fichiers glissé-déposé dans sa fenêtre.</span></span>

<span style="color: #000000;"><span style="background: transparent;">Pour l’installer rendez vous sur </span></span>[cette page](https://github.com/szTheory/exifcleaner/releases)<span style="color: #000000;"><span style="background: transparent;">.</span></span>

<span style="color: #000000;"><span style="background: transparent;">Vous pouvez choisir le fichier à télécharger, en fonction de votre système d’exploitation, et de si vous voulez l’installer ou utiliser la version portable :</span></span>

[![tutos_effacer_traces-download_exifcleaner.png](https://wiki.extinctionrebellion.fr/uploads/images/gallery/2023-09/scaled-1680-/it5K0l4bttWOQsLC-tutos-effacer-traces-download-exifcleaner.png)
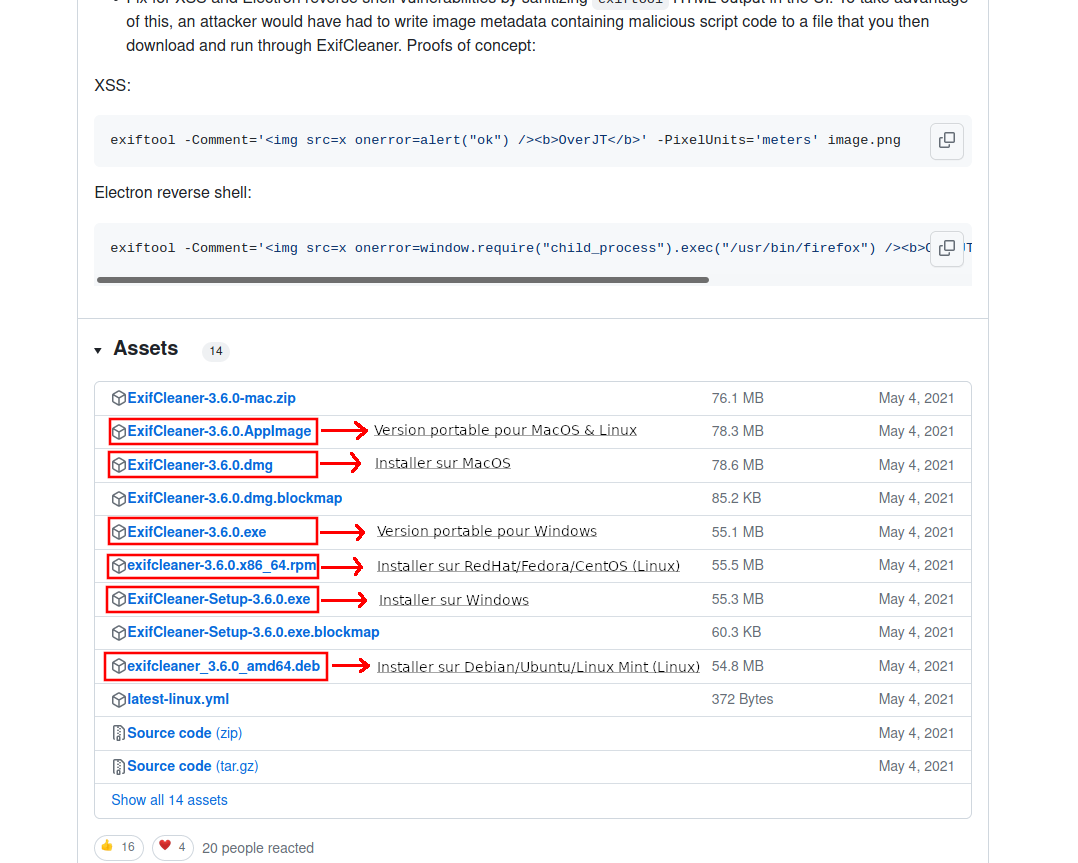
](https://wiki.extinctionrebellion.fr/uploads/images/gallery/2023-09/it5K0l4bttWOQsLC-tutos-effacer-traces-download-exifcleaner.png)

<span style="color: #000000;"><span style="background: transparent;">(Pour savoir ce qu’est un système d’exploitation, [cliquez ici](https://wiki.extinctionrebellion.fr/books/securite-militante/page/t2-effacercacher-ses-traces-sur-ordinateur#bkmrk-explication-br%C3%A8ve%C2%A0%3A-))  
</span></span>

<span style="color: #000000;"><span style="background: transparent;">La version portable signifie qu’il suffit simplement de lancer le fichier, pour lancer le logiciel, là où la version « installation » installe le logiciel sur votre ordinateur avant de pouvoir le lancer.</span></span>

<span style="color: #000000;"><span style="background: transparent;">Une fois lancé, vous avez une fenêtre qui s’ouvre, et vous avez simplement à glisser/déposer le/les fichiers dans la fenêtre pour effacer automatiquement leurs méta-données.</span></span>

[![tutos_effacer_traces-window_exifcleaner.png](https://wiki.extinctionrebellion.fr/uploads/images/gallery/2023-09/scaled-1680-/bu46RDcLUjjpE1tI-tutos-effacer-traces-window-exifcleaner.png)
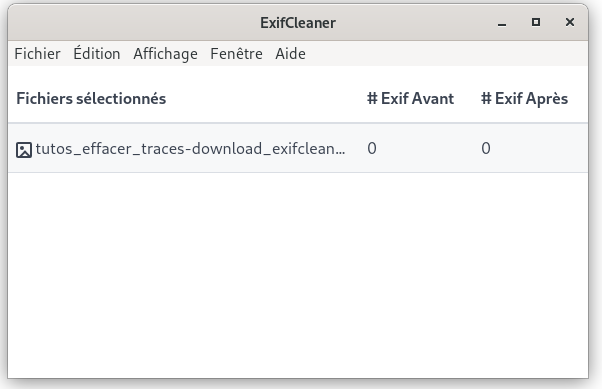
](https://wiki.extinctionrebellion.fr/uploads/images/gallery/2023-09/bu46RDcLUjjpE1tI-tutos-effacer-traces-window-exifcleaner.png)

### **Exiftool**

<span style="font-weight: normal;">([Cliquez ici](https://wiki.extinctionrebellion.fr/books/securite-militante/page/ouvrir-et-utiliser-linvite-de-commandes) pour </span><span style="font-weight: normal;">s</span><span style="font-weight: normal;">avoir </span><span style="font-weight: normal;">comment </span><span style="font-weight: normal;">ouvrir l’invite de commande</span><span style="font-weight: normal;">)</span>

Il existe également un outil en ligne de commande, assez efficace, qui s’appelle « exiftool ».  
Cet outil est déjà installé de base sur le système Tails, cependant, si vous avez besoin de l’installer, vous pouvez faire une des choses suivantes :

**Si vous êtes sur Ubuntu :** <span style="font-weight: normal;">Exécuter cette commande</span>  
<span style="font-weight: normal; color: rgb(236, 240, 241);"><span style="background: #000000;">sudo apt install libimage-exiftool-perl   
</span></span>

**<span style="background: transparent;">Si vous êtes sur un autre système d’exploitation</span><span style="background: transparent;"> :</span>**<span style="font-weight: normal;"><span style="background: transparent;">  
Suivre les instructions de ce lien </span></span><span style="font-weight: normal;"><span style="background: transparent;">dans la section correspondante </span></span><span style="font-weight: normal;"><span style="background: transparent;">à votre </span></span><span style="font-weight: normal;"><span style="background: transparent;">système d’exploitation</span></span><span style="font-weight: normal;"><span style="background: transparent;"> :   
[https://exiftool.org/install.html](https://exiftool.org/install.html#Unix)</span></span>

Voici quelques exemples de commandes.

Voir les méta-données d’un fichier :  
<span style="background: rgb(0, 0, 0); color: rgb(236, 240, 241);">exiftool "&lt;nom-du-fichier&gt;"   
</span>

<span style="background: transparent;">Effacer toutes les méta-données d’un fichier :  
<span style="color: rgb(236, 240, 241);"><span style="background: #000000;">exiftool -</span><span style="background: #000000;">all= "</span><span style="background: #000000;">&lt;nom-du-fichier&gt;" </span></span> (l’espace entre le « all= » et le nom du fichier est à garder)</span>

<span style="background: transparent;">Effacer toutes les méta-données de tout les fichiers d’un dossier :  
<span style="background: rgb(0, 0, 0); color: rgb(236, 240, 241);">IFS=$'\\n'</span> (Nécessaire si certains noms de fichiers contiennent des espaces)  
<span style="color: rgb(236, 240, 241);"><span style="background: #000000;">exiftool -all= $(find </span><span style="background: #000000;">&lt;dossier&gt;</span><span style="background: #000000;"> -type f)</span></span></span>

<span style="color: #000000;"><span style="background: transparent;">Vous pouvez également voir </span></span>[ce tutoriel](https://www.malekal.com/exiftool-ajouter-modifier-copier-les-metadonnees-de-vos-fichiers-en-ligne-de-commandes/)<span style="color: #000000;"><span style="background: transparent;"> en ligne pour plus de détails</span></span>